
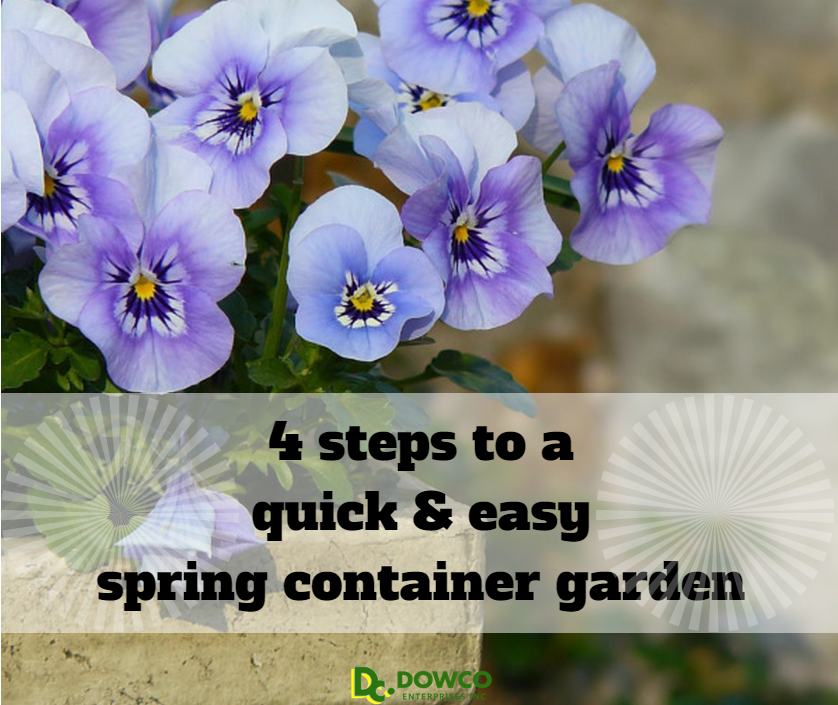
Creating a spring container garden is fun and easy! If you’re like me and live in a smaller space with less room for gardening, or simply prefer the look of containers, then container gardening is for you!
Step 1: Select a Container That Works Best for Your Space & Lifestyle
First you want to find the perfect container for your space. If you need something portable, I recommend a plastic container. Plastic containers come in all sizes and colors to suit your style.

TIP: Avoid using black plastic containers if they will be in the sun for long periods of time.
If you’re looking for something a little more formal and permanent, the terracotta, ceramic, or stone pots may be your solution. These pots tend to be heavier, so if you plan to move your plants around frequently, I recommend looking in to a lighter type of pot. Stone pots are the heaviest and easier to break, but will last longer than other selections of containers.
Container drainage is critical. Ensure that you have holes drilled into the bottom of whatever you use. Some containers come with their own saucers or you may have to create your own. Screens can be useful tools to keep the soil from running out of larger holes.
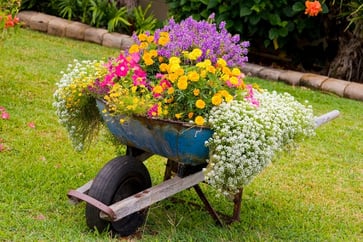
IMAGINE: You can turn almost any household item into your pot and make it a fun project for the whole family. Some have used baskets, old shoes or boots, wagons, barrels, old chandeliers, old dresser drawers, and wheel barrows! Pinterest has lots of photos, just search “spring container garden ideas”.

Step 2: Prepare your Container for Success
Now that you’ve chosen the perfect pots for your spring container garden, they must be filled with potting soil. First, make sure that your spring container garden is where you want it. Unless you have a light pot, chances are you won’t want to move it again when it’s full.

Choose a well aerating potting soil from your local nursery or hardware store. Most experts don’t recommend using soil straight from the garden because it is not well aerated and won’t have the nutrients needed to keep the container plants healthy and thrive!
Our St. Louis soil is mostly clay which is too dense. Mulch too is not the recommended choice because of the acidity. Your annuals may live, but they will never thrive.
It’s also recommended to use a fertilizer to enhance the growth and longevity of the plant. There are a few options and the choice is really up to your preference and how often you want to apply. There are organic versions that can be mixed in with your potting soil such as Milorganite. There are liquid fertilizers that you can mix with water and apply with a watering can after your spring annuals are installed. Be very cautious with this type because if you don’t know what you’re doing you could burn your plants.
TIP: Dowco recommends using organic, water soluble plant food. Read the labels and send us an email if you have questions on what is best for you.
Step 3: Design & Choose a Selection of Plants that You Love & Will Thrive in Your Location
Next, it’s time to select the plants that will be the showstoppers for your outdoor space! There are a few ways to design your pot. The most common technique that I’ll touch on is called the Thriller, Filler, and Spiller Planting Technique.
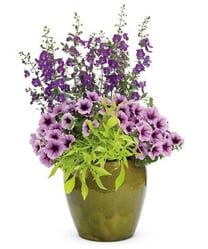
The thriller is typically placed in the back of the pot if it displays from only one side or center of the pot if it can be seen from all sides. Its purpose is to incorporate drama or height to your design. Thrillers can be flowering plants, ornamental grasses, or tall foliage. Common spring thrillers include Angelonia, ornamental grasses, elephant ears, coleus etc.
Fillers are usually more rounded and are meant to fill the container. They can be placed around the thriller to fill in the space around it, but be sure to leave room up front for your spillers. Common spillers include calibrachoa, petunia, lantana, or dusty miller.
Spillers are to be placed in front of the spillers and are typically trailing plants that hang over the edge of the container. If the container will be seen from all sides, be sure to place the spillers all around the container on the edges. If it will only be seen from one, make sure they are located up front. Common spillers include sweet potato vine, creeping jenny, bacopa, or any trailing variety of flowering plant.
TIP: Be sure that you read the tag or the label on your desired plantings to ensure that they’re going to love the environment you put them in. If you choose a sunny spot, you’ll want all sun loving plants. If you incorporate tropicals ensure they have the same water requirements or drought resistance as the other plants in your spring container garden.
Step 4: Install Your Plants, Add a Unique, Personal Touch & Enjoy!
Once you’ve chosen your plants and have them placed just right, it’s time to get your hands dirty!
Don’t forget to add hints of your personality. If you cook a lot, add some herbs to your containers. Incorporate hints of your favorite color in each container. Use one of your hobbies as inspirations; if you like to travel try crafting around a model airplane. The options are limitless!
Here are some other articles that you may like:
Colorful Winter Container Plantings
Fall Container Gardening Ideas
3 Simple Steps to Prepare Your Containers for Winter Weather


